Platform 3D model slicing test
-
3D printing my platform in school
This week I worked on 3D printing the platform. This time, I decided to 3D print in school as the platform itself is a large piece with textures that were not too small. This means that I could use the 0.4 nozzle of the P2S 3D printer in school without losing any details on my print. I did some initial slicing test on Bambu Studios just to check if my 3D model is fine and went straight to printing with the help of Carissa (thanks Carissa! She has been really helpful in my FYP journey).
While I tend to more critical of my works, I was actually quite happy of the outcomes of my 3D print! Below are some of the points of analysis I taken note of.
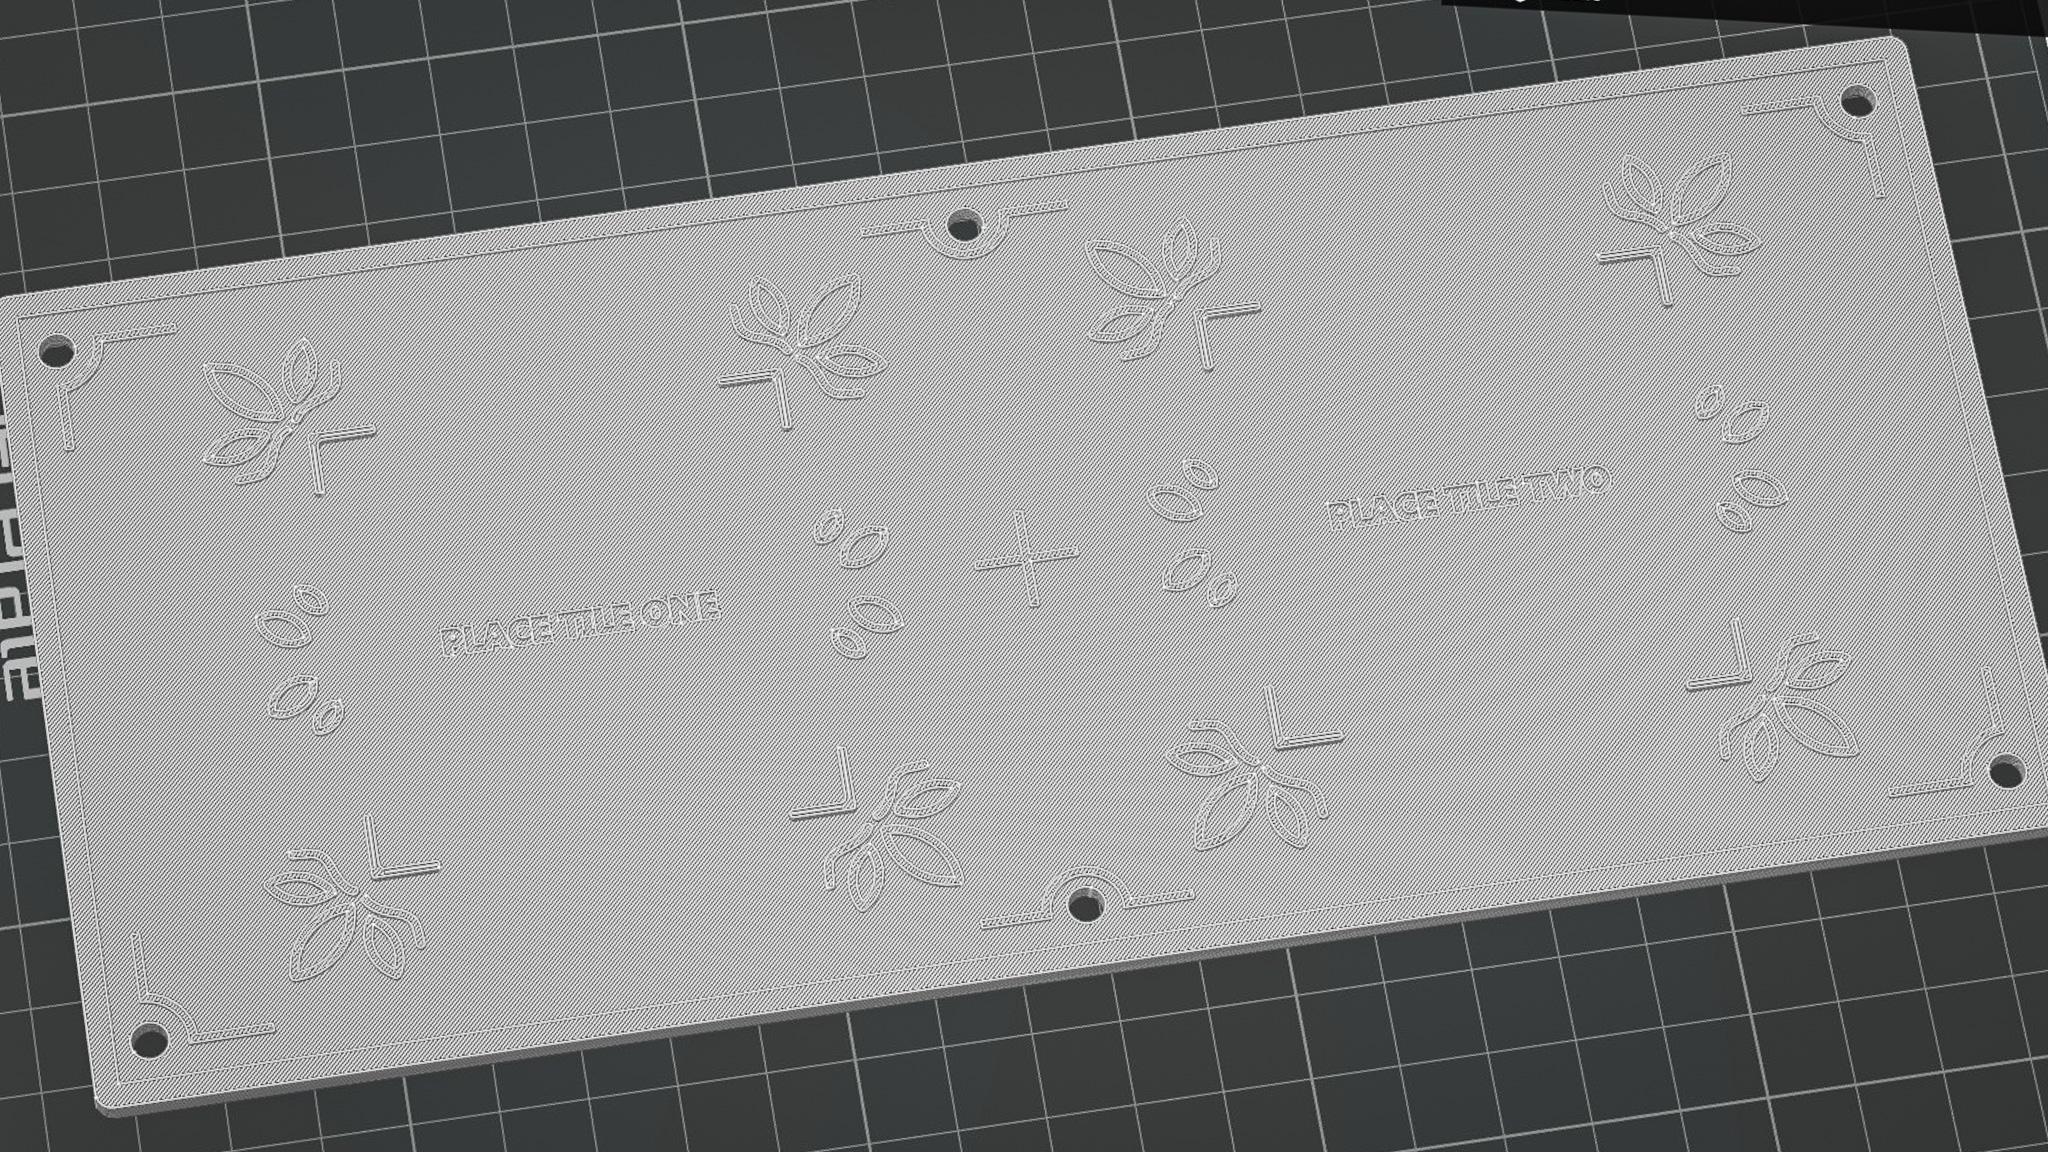
I liked how the textures were printed. The smooth curves and shapes were translated well when printed. This could also be attributed to the fact that the design is larger than that of the tile, so it was easier to print.
I initially thought that I had to remove the cover to place the NFC readers in. However, I realized that the designed slots allows me to just slide in the NFC readers with the cover closed. Despite so, it still fits snugly inside and does not slip out.
My language tiles sits comfortably on where it should be placed on the platform. The corner catches prevents the tiles from slipping out, but is not too tight that its hard to take it out. Great!
The holes at the edges of the cover where the rods from the platform body slots in has not enough allowances. Thus, it was really difficult to open it up once it has been pieced together as the holes grip onto the rods too tightly. Luckily for me, this is not a issue since the NFC readers can just be slot into the back without opening the platform up. I also felt that the words like "PLACE TILE ONE" can be more readable, perhaps this is a pointer that can be fixed with color.
It was time to move on to the next prototype (excited!). To prepare myself for the upcoming prototype, I browsed for some inspiring creative tech projects online and came across this one by Pepepebrick. He has been a great inspiration of mine in my creative tech journey! I love how he employ the use of generative music and integrate it in everyday experiences in his work.
The Egg Sequencer is a musical instrument that allows users to easily create music just by placing different eggs in the carton. Each different slots represents a unique beat, with the color of the eggs controlling the timbre and pitch of the beats. Two different sets of beats generated by two sets of cartons of eggs play at once, to create a layered musical composition.
Firstly, I enjoyed the way that the interface is visually designed. There were UI elements that depicts audio visualizations and supportive visuals
(moving cursors, color trackers) that combine together to help me understand the experience
better. Secondly, my favorite part was how he managed to make the
process of making music so simple (with eggs!) that even non-musicians can have a crack
(pun-intended) at making their own music composition.
My favorite project of his!
Seeing this project made me want to try out VCV Rack (the audio software he used) to create audio-interactive experiences. Doing so will allow me to have more control over the audio / music that I use within my interfaces and even allow TouchDesigner / Arduino itself to manipulate them. Exciting!
Music always seems to have a high barrier of entry (I.E piano, guitar), requiring practice and knowledge. However, this project made me realized that creative technology can bridge the skill gap between lay people and music even with unconventional mediums like eggs.
I feel that Pepepebrick leveraged on the natural characteristics of eggs and how understand them. By using the everyday act of placing eggs in cartons as the input interaction, the interface feels so easy and intuitive to use. Something I should keep in mind - making my interfaces intuitive and easy!
Inspired by the case study, an idea sprang up into my mind. As discussed in week 8 (click here to check it out), we understand that Peranakan tiles have unique visual characteristics and textures, each with their own cultural origins and meaning. Conventionally, learning about these visual textures often rely on our sense of sight and touch (if we can touch it!). But what if we can add the sense of sound into the learning experience by embedding each design with its own unique audio beat? In this way, participants not only know how the textures look, but can also recall how it "sounds" to help them in their learning process.
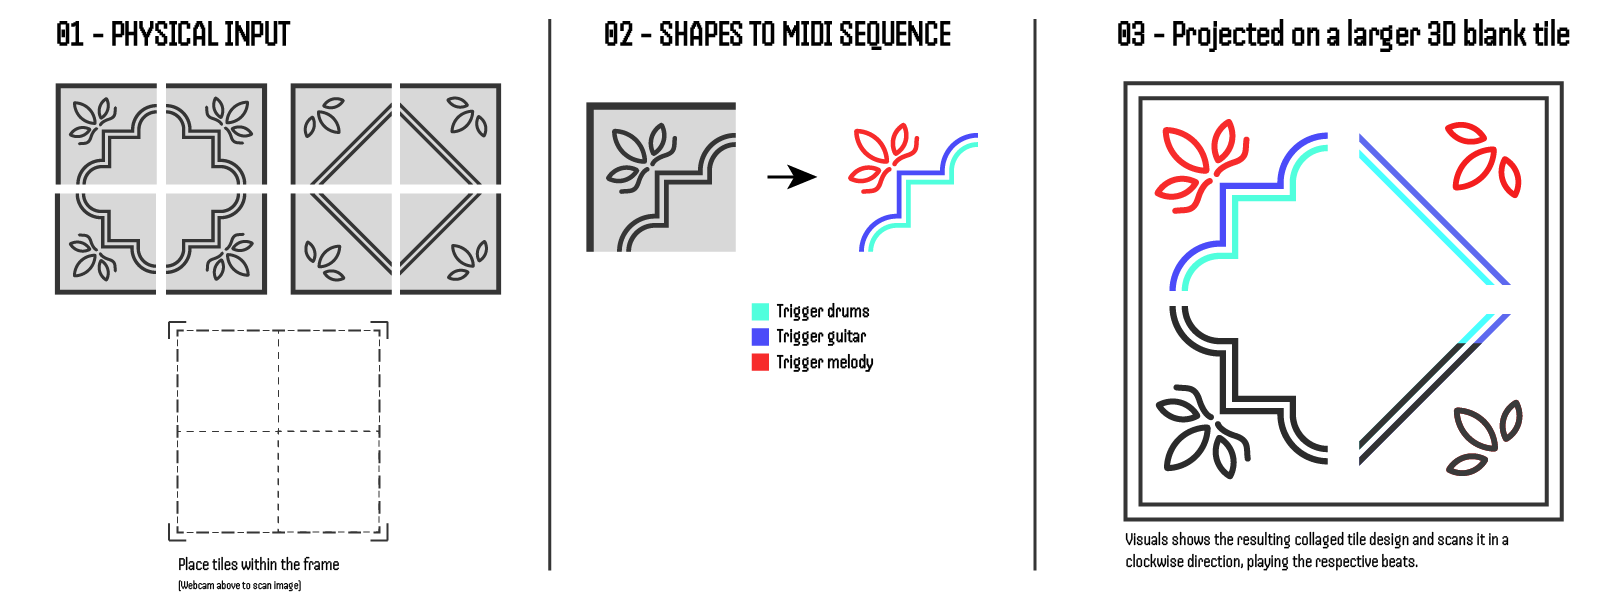
The Interaction Concept of Prototype Two
There will be 2 sets of tiles designs that are separated into 4 parts. Users mix and match components from these two sets and place them into a frame, creating their own tile composition.
A webcam mounted above the tile composition captures its image and registers the different textures within them. Each different texture triggers different parts of a musical composition (rhythm etc). As such, the tile's shapes becomes a MIDI sequencer.
A large blank tile is mounted on the wall, where the visuals of the current tile composition is projected upon. The visuals start to color in a clock-wise fashion, showing how the code is reading the shapes/textures and playing the musical notes that is triggered by it.
Honestly I dont know. It was a idea which I conceptualized and I felt it's potential, but yet at this moment feel so technically impossible. It feels quite scary because I am confronted with the possibility of scrapping the idea (which I really really want to make it work) and "wasting time" that can be spent on more practical prototypes that I know I can do. But somehow I felt so motivated, something about this struggle intrigues me. It feels like a big puzzle that is waiting to be solved. Anyways I noted down below what are the questions / struggles I have for my own reference.
This idea would leverage heavily on music making softwares like Ableton and VCV Rack. Not only do i not have any music backgrounds, the learning curves for these softwares are challenging. Nonetheless, I have to pick one and learn to get started.
I actually have not tried before in TouchDesigner, where I convert a webcam image into a visual shape. I have to figure out ways of filtering the webcam image (like selecting specific brightness/hues) to get TD to draw the image.
It's quite daunting to do projection mapping due to a series of concerns, such as space, brightness and technique. While I have attended some projection mapping workshops, I still lack good practical experiences. Still got to give it a try. Maybe rent a project
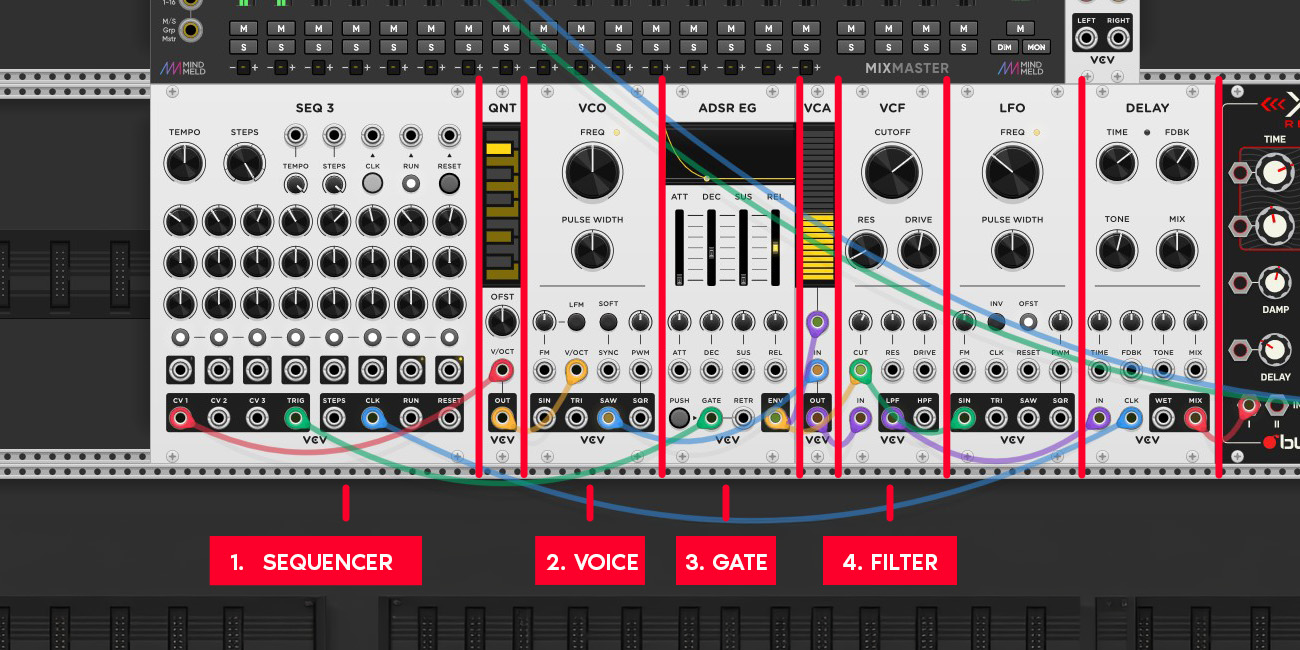
The structure of a musical patch in VCV Rack
And so it begins. I learnt some VCV racks tutorial on Youtube and learnt the basic structures of how VCV rack works. There are different modules that does different roles (similar to TD nodes?) and to get these modules to communicate with each other, you have to connect digital cables into two types of inputs. The first input is called Control Voltage (CV), which controls amount of electricity that passes through, which is important as it determines the pitch and tone of the beat. The second input is called the Gate, which is when the beat will play. There are more things I learnt, so I listed them down below.
A basic patch is made up of a Sequencer - VCO (voice) - Gate - Filter - Audio Out. The Sequencer specifies the timing and pitch of the beats, the VCO is the soundbox that produces the sound, the Gate determines when the sound plays and the Audio Out is just for audio to play out from the device.
There are actually plenty of external modules that can be downloaded and used. For example, I am using a Reverb module that allows me to add and control the reverb of my music composition. I need to slowly explore and understand what other modules exists and what they can do.
Other then turning the frequency knob in the VCO, the ADSR (attack, decay, sustain and release) module has a big impact on how the beat sounds. Having a low attack and decay rate can achieve a sharper and faster beat, while increasing sustain will create something that lingers in the sound space longer.
Honestly nothing musically amazing, but i managed to string together a patch and make some sounds! That is a huge win in my book. Moving forward, I need to figure out how I can shape the sounds better and move onto composition and layering as that is a big part of my prototype's idea.
My First Track!
I came across a tutorial that taught me how I can use generative shapes in TouchDesigner to work as a
MIDI sequencer for VCV Rack. In this experiment I did, I sampled a beat of the Rebana drum (a
traditional Peranakan Instrument) and used sliding rectangles in TouchDesigner to trigger a beat.
There is a center line that detects black levels and if it exceeds a threshold, it sends a Trigger
output, which data can also be
imported into VCV Rack to trigger the beats too.
I was really happy with the outcome of this quick experiment as it makes my pursuit for this prototype
so much closer!
-
Using Rectangles to Trigger a Beat
I learnt how I can use a module called "cvOSCcv" to transmit data between TouchDesigner and VCV Rack. The module is simple to use and have multiple inputs / outputs jacks, allowing for multiple transfers of data.
The most promising takeaway for me as this tells me that my idea is possible. I have learnt how to use color and brightness thresholds as a method to "scan" what visual is currently on screen and have them generate data. I also learnt how to use this data to trigger the beats, through the cvOSCcv module.
I learnt how I can sample existing instruments (or anything really) and fine tune them to sound pleasing. I used a module called "SickoSampler" that allows me to place sample mp3 inside and allow MIDI controllers to trigger their audio output and audio transformations.