Open studios is approaching and I am starting to get worried about my set up. Currently, my Music
Tiles prototype is still in development and I have to figure out how to piece it all together in the
next few days. I am also contemplating on using projection mapping for it, so that's another technical
challenge I have to work out on. Furthermore, I still have to worry about table set up, getting my
project research all together and presented well.
While all might seem daunting, I learnt
this one thing in my military service days which i believe works well here -- If you don't know what you're doing, just do and you will figure it out!
I spent the past few days listening to generative music and well, music in general. I found two specific generative mixes that I really liked. The first one (left) uses living plants to make beats, while the second one (right) uses python to code the rhythm and pacing of the beats. Most importantly, they both sound good and exposes me to the two different types of generative music (slow and fast).
Signs of Life is a generative music mix that uses the pulse of a living plant as one of its anchoring beats. A sensor is plugged into the plant itself, and it's pulses and recorded as data that is then used to trigger beats. It leans more towards a ambient mix with its "drone" like audio and slower bpm.
A fast paced, drum and bass mix using python as its coding language. Honestly one of my favorites set of generative music because of how the music builds up by enhancing its sequence with another layer of beats and sounds. I also find it fascinating how python can actually be used to achieve this.
Below are some notes that I have taken down that I felt would help me in my music-making episodes!
Listening to these beats made me recognize the importance of layering musical beats. For example, the drum and bass beats often consists of a few elements at once, such as a 1. Base Rhythm, 2. Melody and 3. Background Drone. The drone audio (the drawn out atmospheric sounds) fill the blank spaces, the rhythm gives pacing while the melody gives it character.
I noticed how the beats are synchronized on the same base rhythm. They dont overpower one another, but the melody accentuates the rhythm, while the rhythm feels in sync / timed with the melody. Something I need to take note of when I make my own music again.
In "Signs of Life", I noticed how the beats have a reverb to it. The sound lingers instead of just triggering and stopping. This prolongs the presence and transform the audio to be a completely different sound. Definitely got to try reverbs more!
The current (bad) idea of the prototype
After the realization from the previous section, I felt that I needed to rework my prototype's idea. To recall, good music tends to consists of layers, played together simultaneously and cohesively. However, my current idea has two issues.
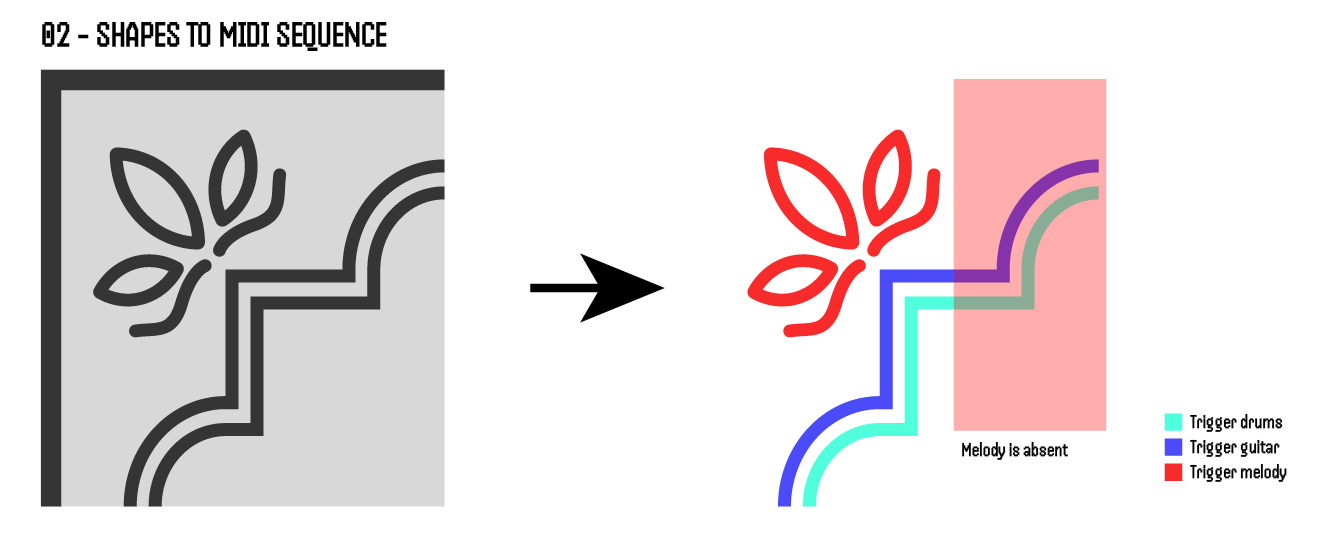
The current idea is that the interface scans the design at a clockwise texture. Thus, there will be parts where the scan will not involve the Melody shapes, and thus the melody will be absent, reducing the layering of the music composition.
Currently, both the drums and guitar is the exact same shape. This might cause a issue where both of their beats sound too similar. Thus, might cause a issue where they fight over each other in the music composition.
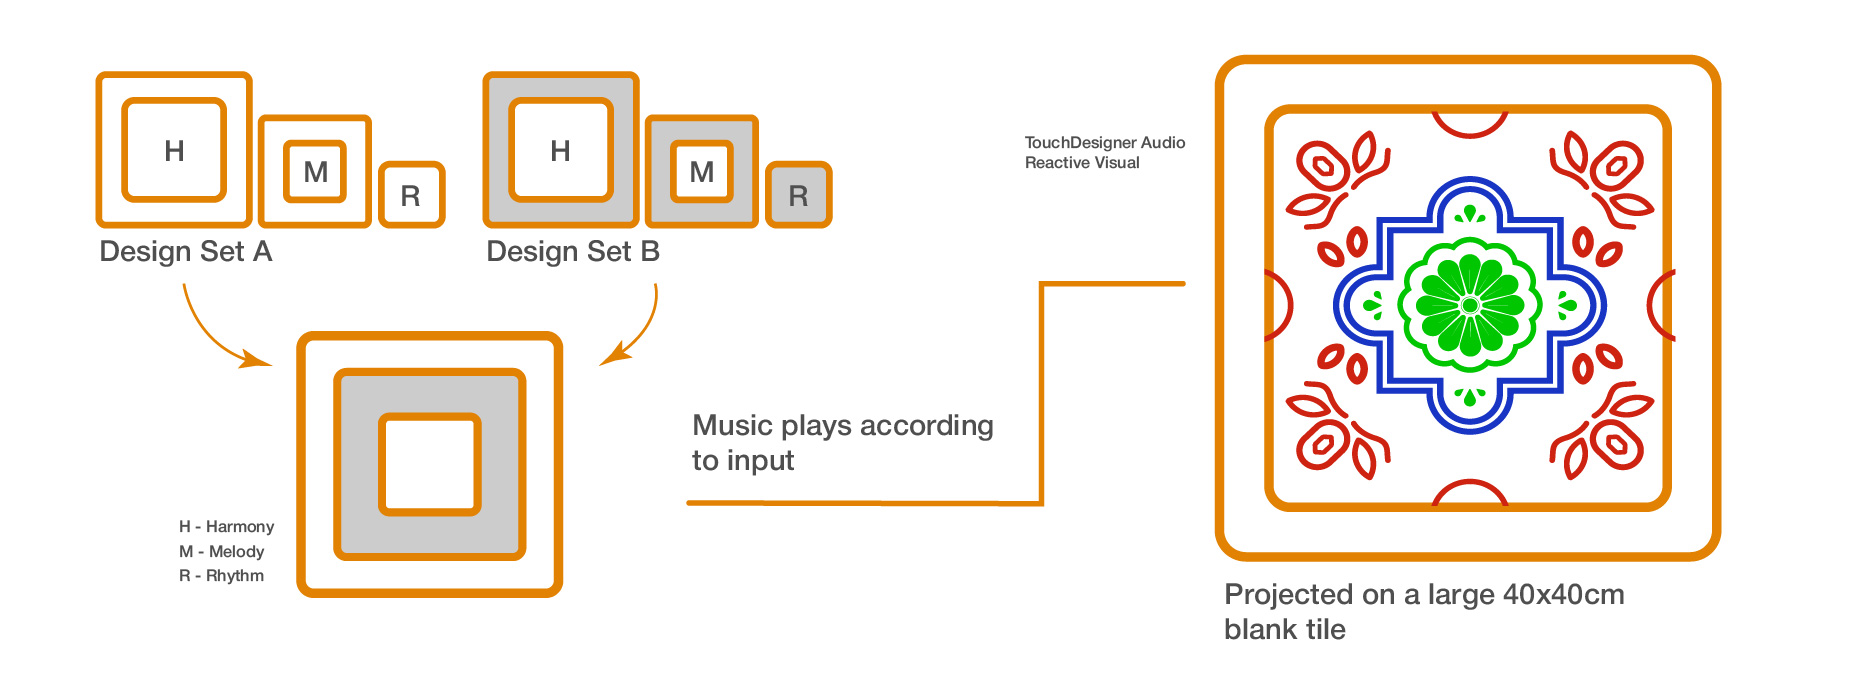
In the new idea, I changed the way I dissected the tiles to separate them by their Corner Design (Red), Frame Shape (Blue) and their Center Motifs (Green). This way of separation allows me to assign them to the 3 different elements of music which are Rhythm, Harmony and Melody. Below are some structured key notes of the concept.
There will be two different sets of tile designs, each with three pieces respectively. Each piece has their own unique audio beat.
The fun part here is that users can mix and match the pieces from both tile designs together in the empty frame, creating their own tile design and by extension, their own music composition.
There will be a empty 40x40cm blank tile on the wall where the current collaged visuals will appear. The visuals will react according to the music and show what tile components are placed.
Aligning with my topic of Embodied Learning in Cultural Heritage contexts, the interface presents a new way for participants to learn about the textures present within Peranakan Tiles. Conventionally, learning about tile textures rely heavily on the sense of sight and touch, but this interface provides an addition sense of sound through music. This allows participants to not only recall what the texture looks like, but also sounds like and ultimately help their learning.

Left to Right: Random Sampler, Macro Oscillator and Chronoblob2
To proceed with my new iteration, I learnt new tools to help me make more beats! I watched more tutorials online and learnt new modules in VCV Rack. The above image showed some of the new modules that I have learnt and here's the breakdown of them below!
Random sampler is a excellent tool for making generative music. It basically generates random, dynamic pitches and rhythms which is the basis of generative music. The best part of this is that I can fine tune how "random" the beats are, and I can lock the sequence of beats if i hear a sequence i like with the Deja Vu knob! Fantastic.
Macro Oscillator is like the "voice" of VCV. It is the module that produces sound. The great thing about this module is that there are plenty of presets, like the guitar or drums, that allows the generated sound to mimic these instruments. There's also knobs I can use to fine tune the sound even more, like the timbre and pitch!
So after realizing the power of reverbs in the last section, I found this module that basically acts like a reverb. It adds delay and feedback to the sound, and can prolong its presence making it sound magical. Simple, but works wonders.
Learning from the previous section as well (so much learning), I decided to try layering my beats to
make a composition. I synthesized a rhythm, harmony and melody beat that follows the same base rhythm
(so they sound cohesive) and played them all at once. I was really happy at the outcome because it
worked well! The lower pitched beats is the rhythm, the guitar is the harmony and the higher pitched,
xylophone sounds are the melody.
Since there are two separate tiles designs i plan to use, I
synthesized two different sets of compositions.
-
A example where I composed the Rhythm, Harmony and Melody together.
With the beats ready, it was time to figure out the physical interface. At this point, I have a rough
idea of how the technology will work, which is using top mounted webcam to capture the color data of
the
individual tile components. Thus, color is important here, so I need
to choose two distinct colors that will make it easy for the system to distinguish. For the form of
the
pieces, I followed what I had ideated earlier where each tile design have 3 separate pieces.
I decided to use acrylic and laser cutting as the main method for now as it is relatively quick (in
time for open studios!). So I worked on creating the laser cutting template and got it cut the next
day. Below are some other things that I did.
I also made a simple frame that guides and holds the pieces into place when it is placed down. I cut a base piece of acrylic and added tiny acrylic blocks that serves as the "frame" to hold the pieces.
I printed the designs of the tiles on vinyl stickers so i can apply them onto the acrylic pieces. The colors are red and blue to help the interface's functionality in detecting color differences.
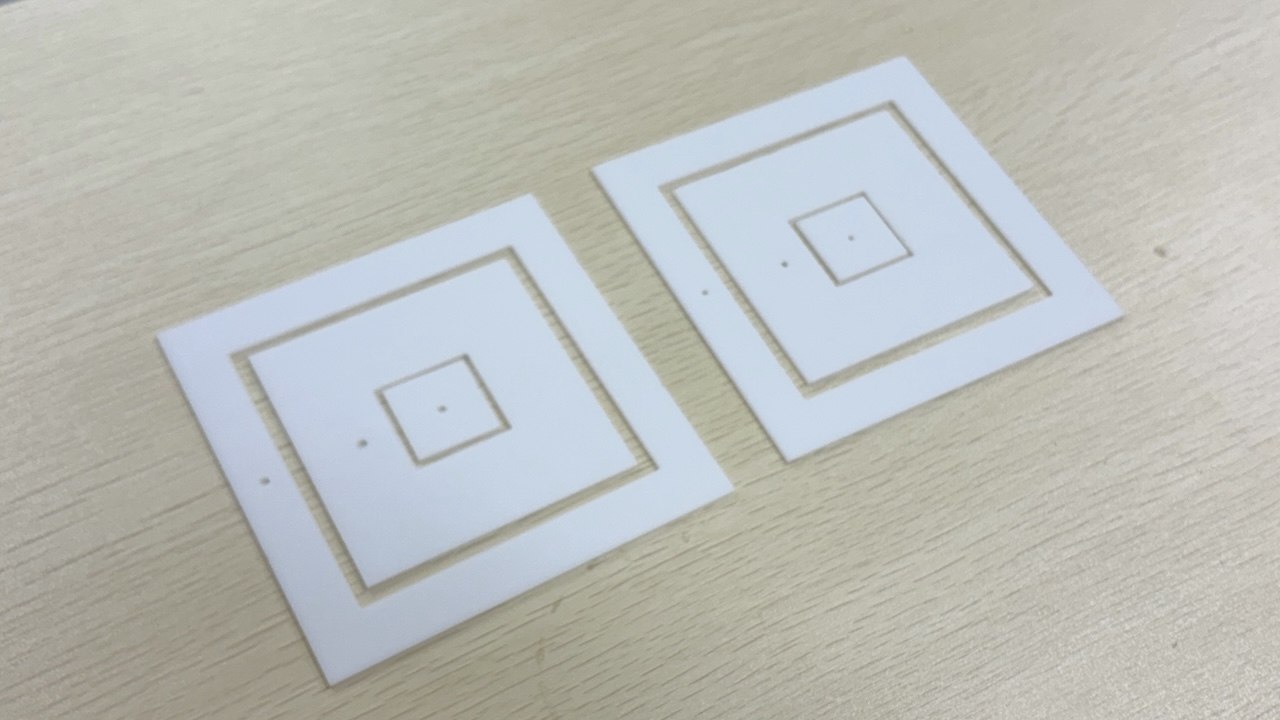
The pieces are cut!
-
Pieces fitting well into frame
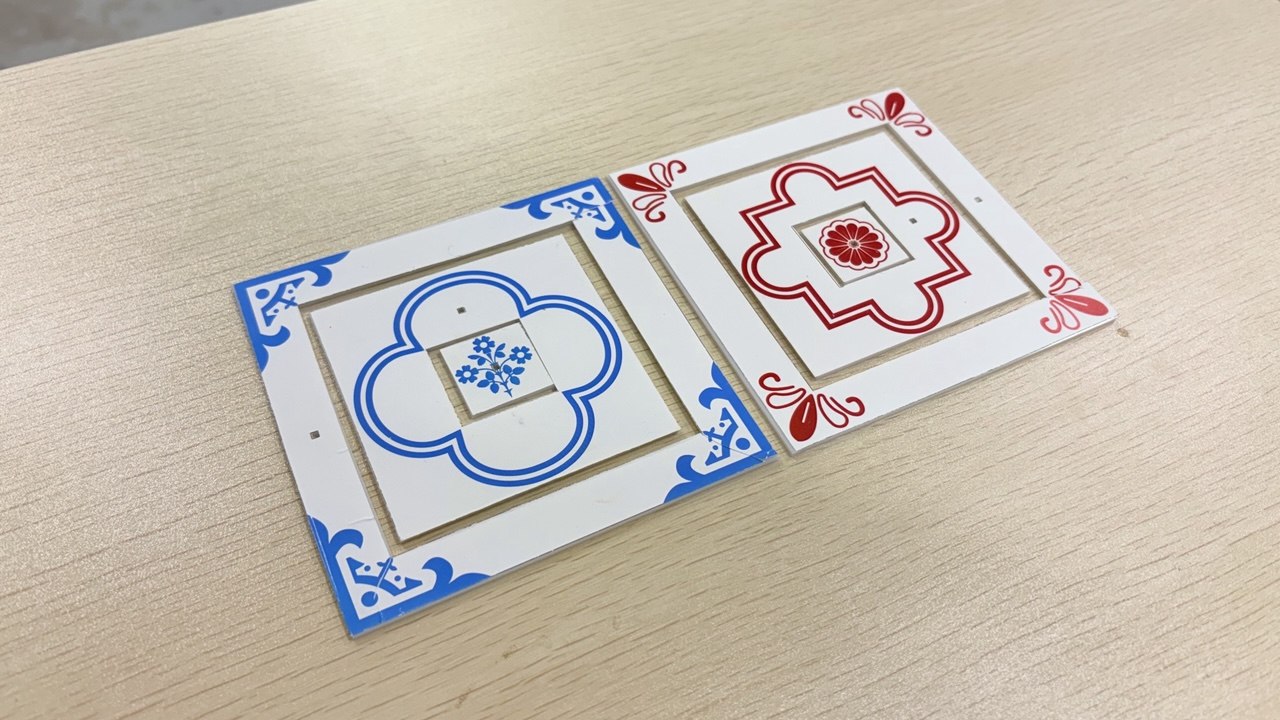
Sticking Vinyl stickers onto the pieces
To elaborate on the new visuals on the tiles, I did further research on tiles visuals and referenced
their designs to create my current visuals. After some consideration, I wanted the visuals of my
tile's textures to be more consistent with existing tile designs,
something which my current Peranakan Language 3D model tiles lacked at the moment due to me
adding random geometric shapes at certain areas (even though it follows their geometric style).
I had to scale the center motif and frame so I can get the designs to fit into the shapes of
the acrylic cut outs.
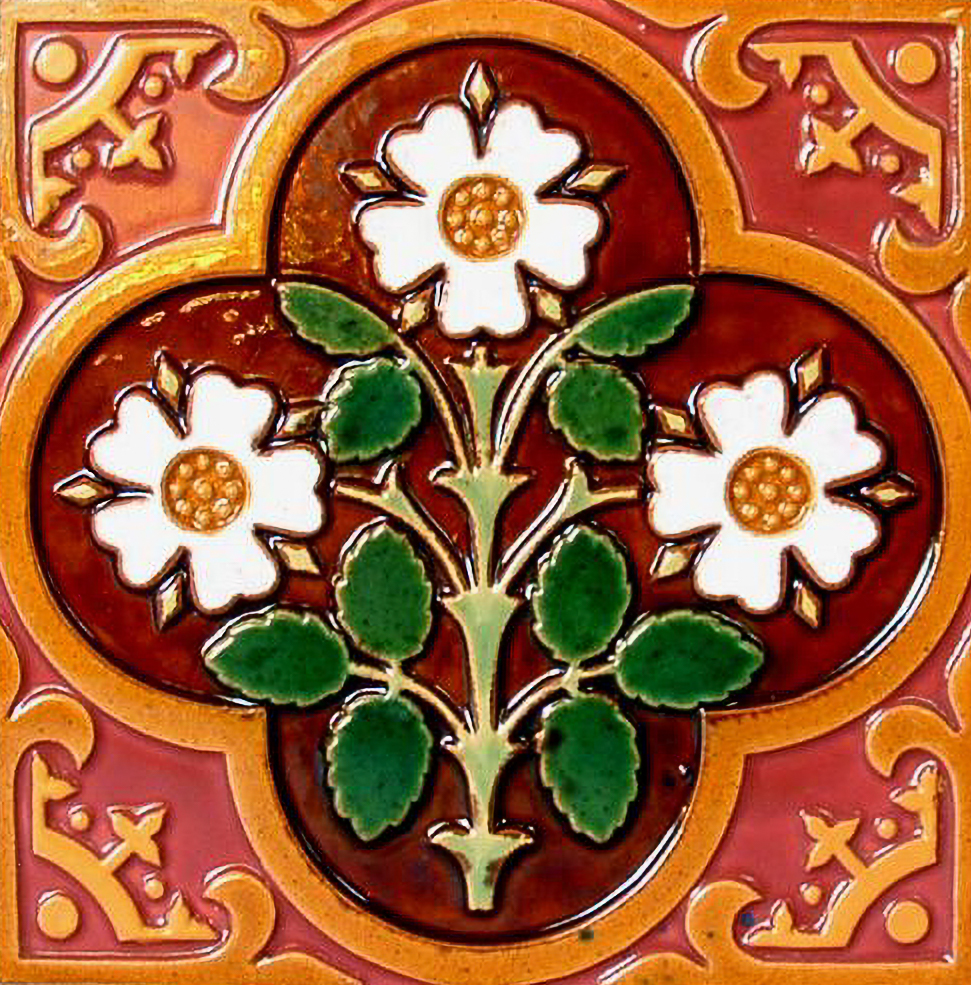
Referenced Peranakan Tile

Vector representation
Now we have the physical interface and the beats, its time to put it all together. Below are the three key objectives I had and how i go about achieving it.
I mounted a webcam above the acrylic tile frame to capture the image of the collage tiles and imported this footage in TD with VideoDeviceIn. I then cropped three different parts of the image to capture a portion of each of the acrylic components (like one texture of the Corner Design or one segment of the Frame Shape).
I then translated the image data into numeric data by isolating the reds and blue levels in the image through a Analyse TOP that tracks their current levels. I then create different Logic CHOPS that only activates once a certain amount of red/blue threshold is reached to trigger their respective assigned audio and visuals in TD.
I used a OSCout CHOP to send out the CHOP data directly into VCV Rack and used a cvOSCcv module (which I tried last week) to receive the data and use it to control the music volumes. So viewing it as a whole, the colors of the acrylic tiles will directly trigger the different music in VCV rack.
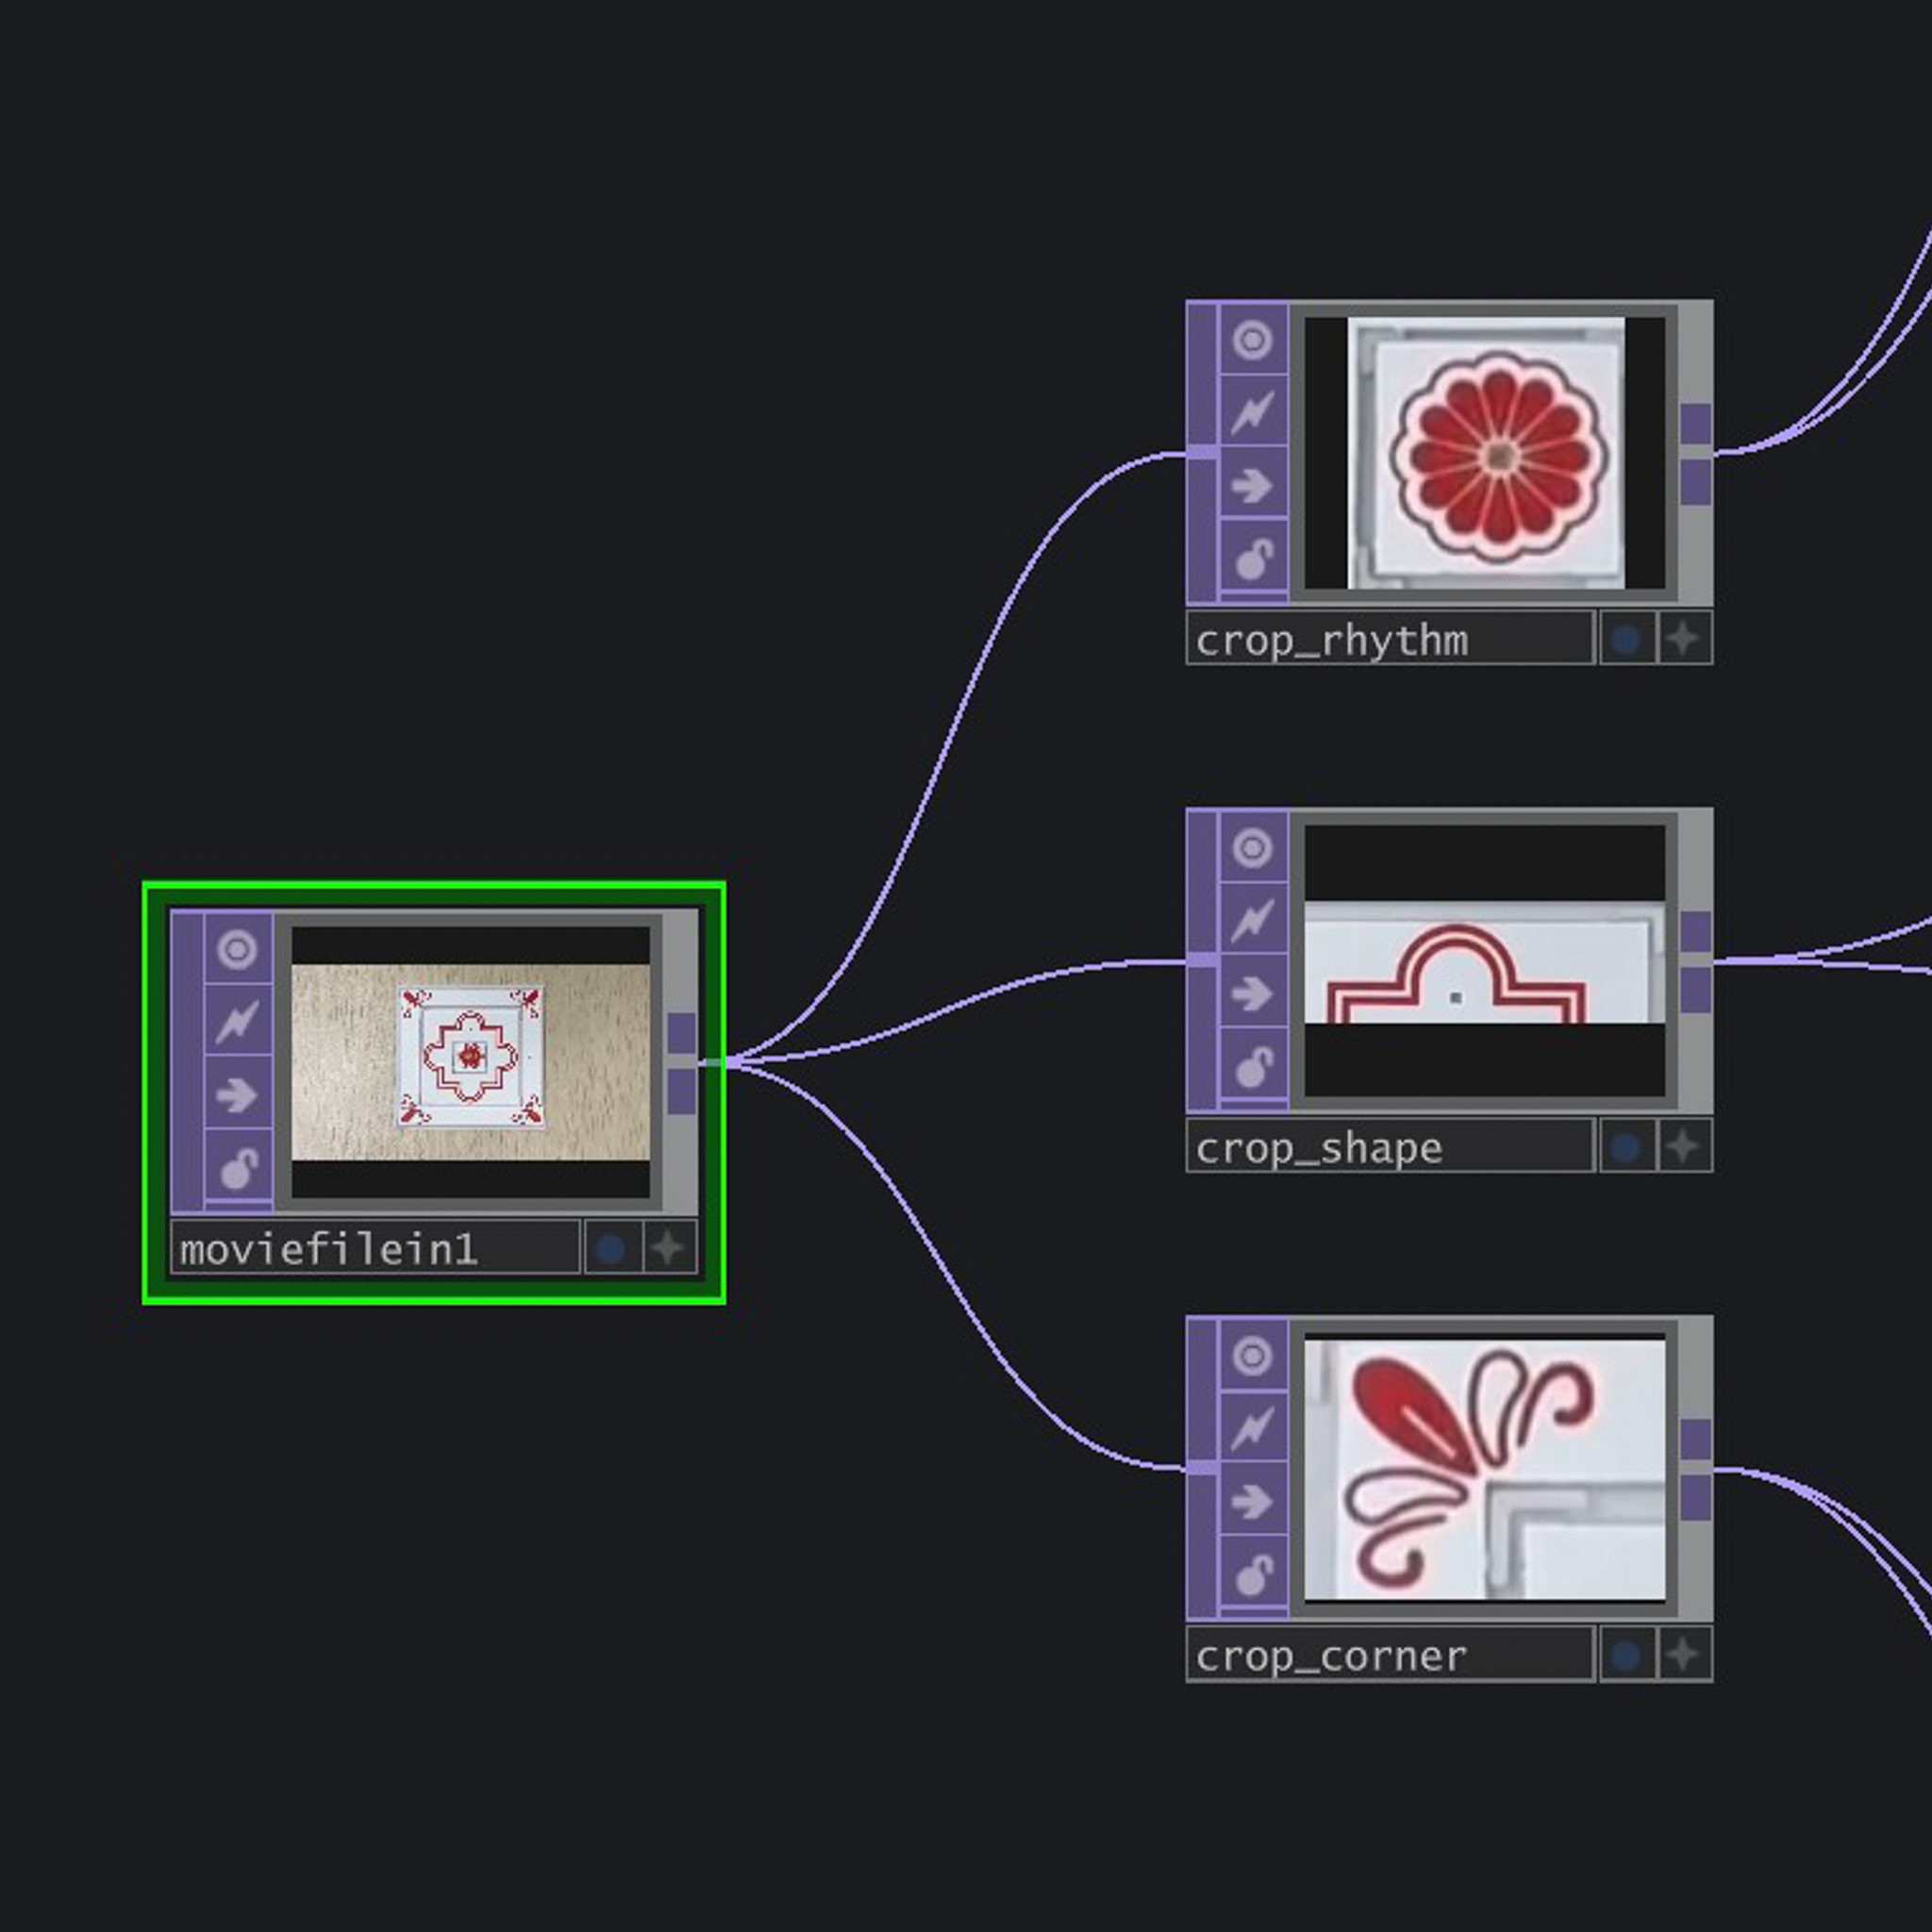
Cropping the image from webcam
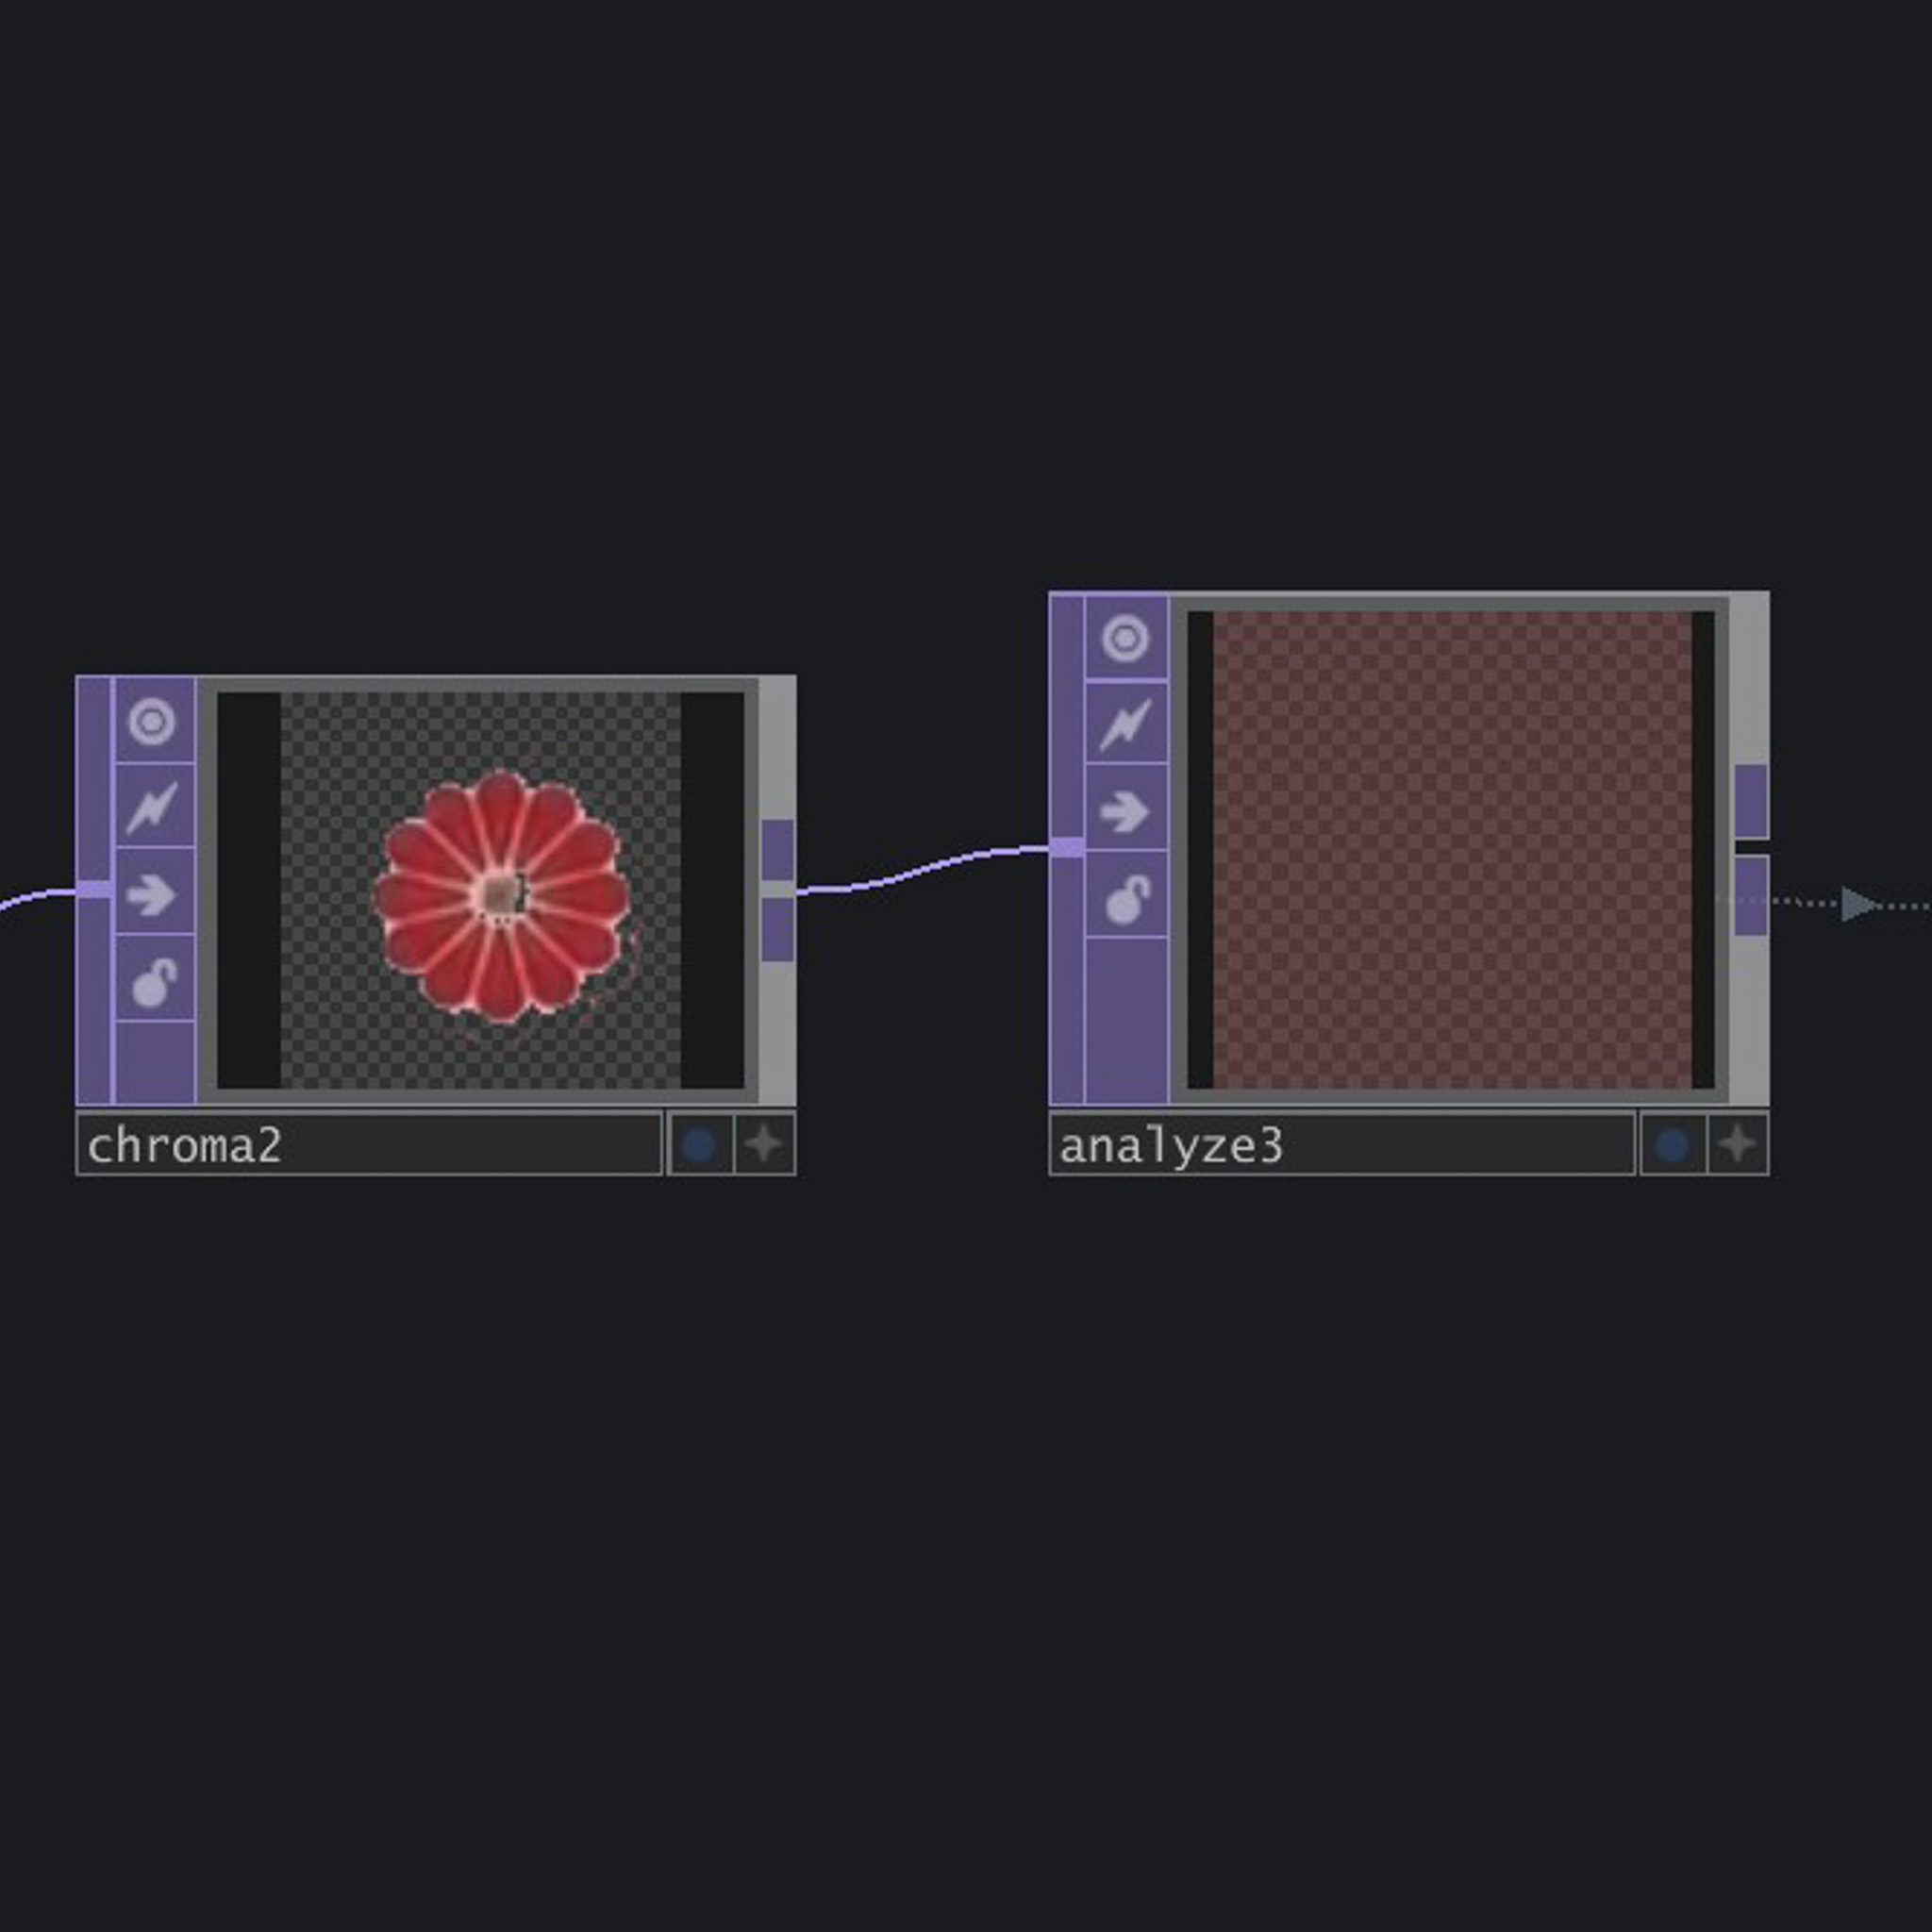
Analyzing the level of red
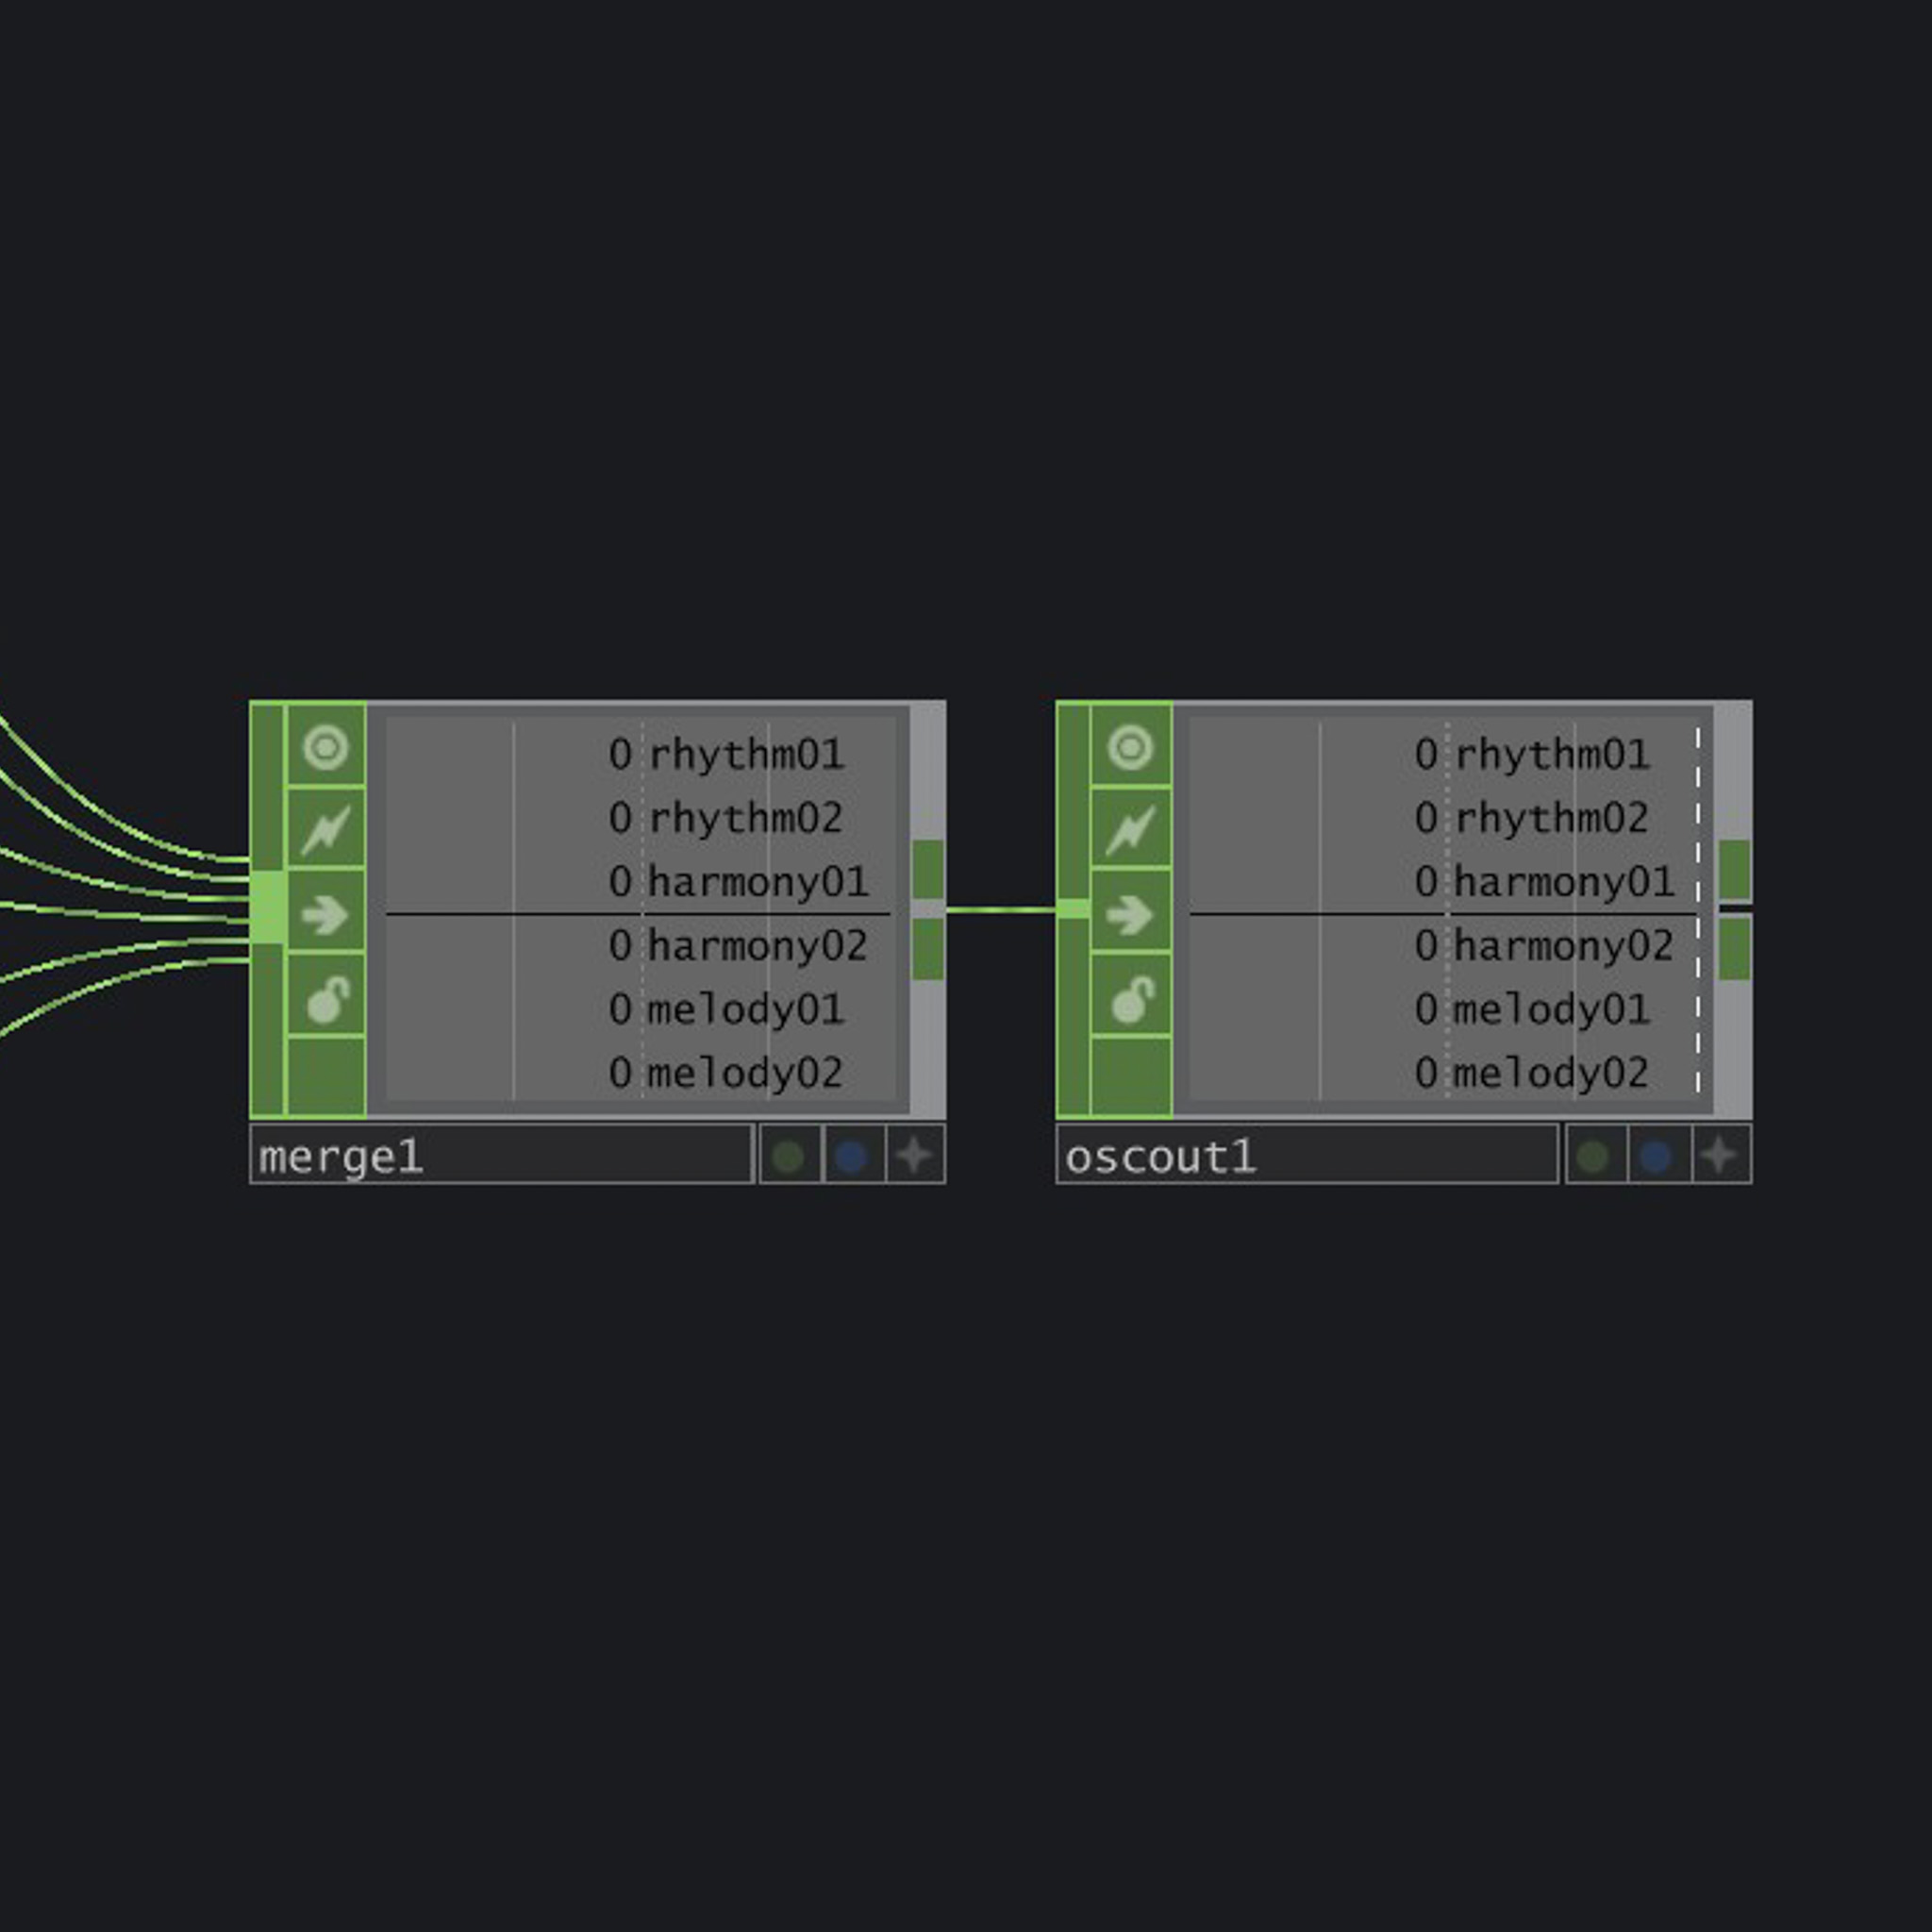
Sending the CHOP data into VCV Rack with OSC out
While setting up for open studios, I managed to shoot a pretty neat video of my prototype (since my table is so clean now lol). Initially I did want to do projection, but my initial tests with the projector makes it physically tough because of the throw distance of the school projector. So I went back to it being screen base, which is still fine!
-
The current outcome